Want to know how Docker containers work? We’re gonna find out! Today we’re going to simulate container networking. We’ll do this with magic of Linux namespaces, virtual ethernet devices, bridge devices, and iptables.
Note You’ll need root access to be able to run given commands.
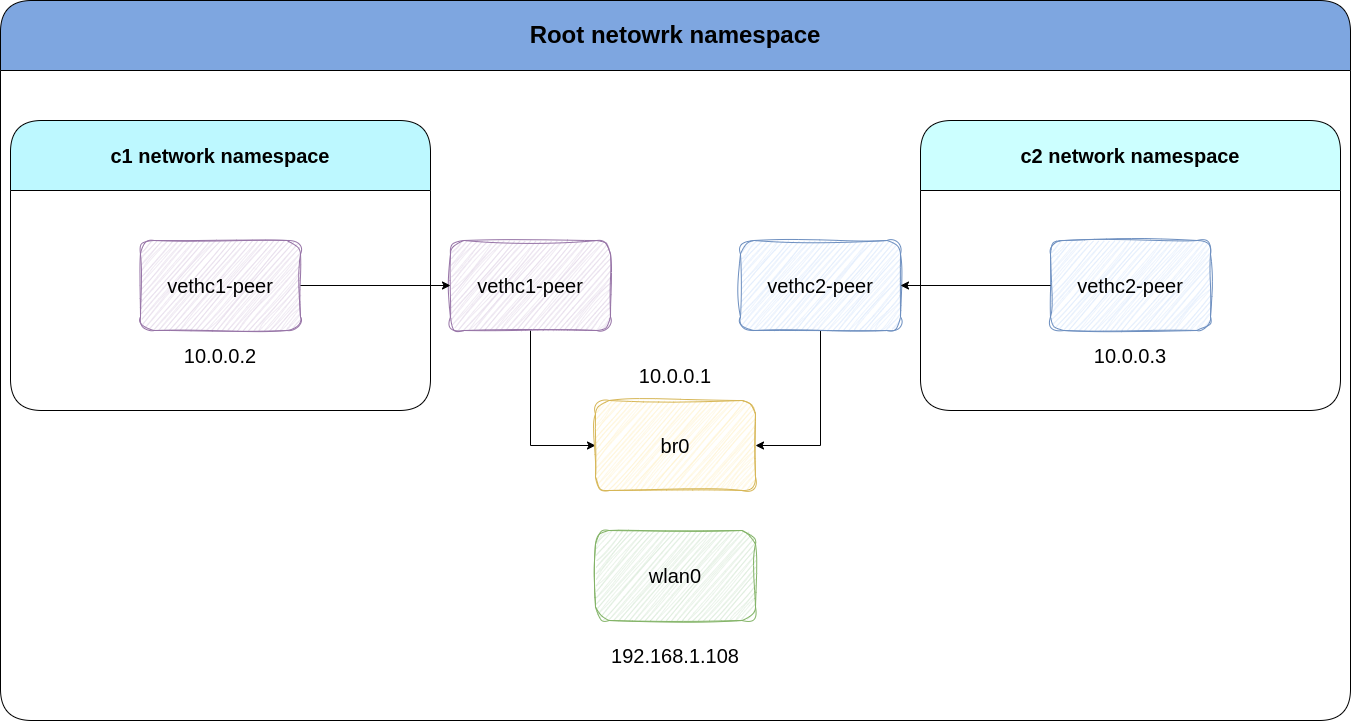
First, we’ll create two network namespace for containers container-1 and container-2 named c1 and c2. This command will create two seperate namespaces which have their own interfaces and routing tables:
ip netns add c1
ip netns add c2
Now, we’ll create veth interfaces. As the man page says, the veth devices are virtual ethernet devices. They can act as tunnels between network namespaces to create a bridge to a physical network device in another namespace, but can also be used as standalone network devices. Veth devices, are pairs of virtual network interfaces. Each pair consists of two ends: one end resides in one namespace, while the other end resides in another.
ip link add vethc1 type veth peer name vethc1-peer
ip link add vethc2 type veth peer name vethc2-peer
Now, we’ll need to isolate them out. by moving them to their own network namespaces. We’ll do this by using command below:
ip link set vethc1-peer netns c1
ip link set vethc2-peer netns c2
Now our veth-peer interfaces have their own isolated network namespaces. Run command below to see how they’re isolated and only have two interfaces, their very own lo and veth-peer devices:
ip netns exec c1 ip a
The output will be something like below. We have two interfaces which are in DOWN state meaning they’re currently not working as we want to. When you bring the interface up/down you’re merely setting a flag on the driver that the state of the interface is up or down.
We’ll enable them later.
1: lo: <LOOPBACK> mtu 65536 qdisc noop state DOWN group default qlen 1000
    link/loopback 00:00:00:00:00:00 brd 00:00:00:00:00:00
131: vethc1-peer@if132: <BROADCAST,MULTICAST> mtu 1500 qdisc noop state DOWN group default qlen 1000
    link/ether 86:c4:64:8f:56:06 brd ff:ff:ff:ff:ff:ff link-netnsid 0
Now that we have two namespaces each having their own veth interfaces, we need an IP address for them, right? So let’s give them their IPs:
ip netns exec c1 ip addr a 10.0.0.2/24 dev vethc1-peer
ip netns exec c2 ip addr a 10.0.0.3/24 dev vethc2-peer
Now, we’ll bring the veth peer and loopback devices up inside each namespace:
ip netns exec c1 ip link set dev vethc1-peer up
ip netns exec c1 ip link set dev lo up
ip netns exec c2 ip link set dev vethc2-peer up
ip netns exec c2 ip link set dev lo up
Time to make the connectivity magic of bridge happen! By creating a bridge interface, we can connect the two virtual interfaces together. You can literally think of a bridge in real world!
ip link add name br0 type bridge
The command below will tell the virtual interfaces to accept br0 as their master.
ip link set dev vethc1 master br0
ip link set dev vethc2 master br0
Now, we’ll need to add an IP address to the bridge interface. This way, br0 can act as a router, enabling communication between two veth pairs:
ip addr a 10.0.0.1/24 dev br0
Enable the br0 interface:
ip link set dev br0 up
You can think of veth-peer devices as tail of a snake. So, where’s the head? Well, vethc1 and vethc2 are the heads. We’ll enable these interfaces to be able to talk to the veth peers:
ip link set dev vethc1 up
ip link set dev vethc2 up
And finally, we set default gateway in each namespace. But why? we already have 10.0.0.0/24 route. Don’t believe me? run:
ip netns exec c1 ip r
The output is show below:
10.0.0.0/24 dev vethc1-peer proto kernel scope link src 10.0.0.2
The reason why we set a default gateway for our virtual interfaces is that they’ll be able to talk to other interfaces of the host like eth0 or wlan0. So:
ip netns exec c1 ip r a default via 10.0.0.1 dev vethc1-peer
ip netns exec c2 ip r a default via 10.0.0.1 dev vethc2-peer
Done! We simulated two containers talking to each other. This is how containers work.
They can see bridge IP, each other, and my wlan0 of my laptop.
For example, vethc1 can see bridge 10.0.0.1 and veth2 10.0.0.3:
root@dont:~# ip netns exec c1 ping 10.0.0.1 -c1
PING 10.0.0.1 (10.0.0.1) 56(84) bytes of data.
64 bytes from 10.0.0.1: icmp_seq=1 ttl=64 time=0.065 ms

root@dont:~# ip netns exec c1 ping 10.0.0.3 -c1
PING 10.0.0.3 (10.0.0.3) 56(84) bytes of data.
64 bytes from 10.0.0.3: icmp_seq=1 ttl=64 time=0.091 ms
And also my wlan0’s IP which s 192.168.1.108:
root@dont:~# ip netns exec c1 ping 192.168.1.108 -c1
PING 192.168.1.108 (192.168.1.108) 56(84) bytes of data.
64 bytes from 192.168.1.108: icmp_seq=1 ttl=64 time=0.105 ms
But what if I want to ping Google’s public DNS 8.8.8.8? What happens?
Well, if you want to ping 8.8.8.8, the source IP of packet leaving your host is going to be IP of veth interfaces, which is an private IP address and is never going to reach Google.
First, launch another terminal and ping 8.8.8.8 from first veth peer:
ip netns exec c1 ping 8.8.8.8
We can use tcpdump to see capture packets traversing through network:
root@dont:~# tcpdump -ni any dst 8.8.8.8
16:30:13.630833 vethc1 P   IP 10.0.0.2 > 8.8.8.8: ICMP echo request, id 50500, seq 6, length 64
16:30:13.630833 br0   In  IP 10.0.0.2 > 8.8.8.8: ICMP echo request, id 50500, seq 6, length 64
In the first line of output, vethc1 will send a packed with source IP of 10.0.0.2 to destination 8.8.8.8. Then, because the default gateway of vethc1 interface is br0, br0 will get packet, and give it to my wlan0 which is also the default gateway of my root network namespace and br0’s.
Here comes the problem. wlan0 will need to forward the packet, but forwarding is not enabled on my host, so it will drop the packet and we fail to see 8.8.8.8.
So, let’s enable ip forwarding. Run command below to enable it:
sysctl -w net.ipv4.ip_forward=1
Now let’s do another tcpdump:
root@dont:~# tcpdump -ni any dst 8.8.8.8
16:44:11.020648 vethc1 P   IP 10.0.0.2 > 8.8.8.8: ICMP echo request, id 32992, seq 52, length 64
16:44:11.020648 br0   In  IP 10.0.0.2 > 8.8.8.8: ICMP echo request, id 32992, seq 52, length 64
16:44:11.020681 wlan0 Out IP 10.0.0.2 > 8.8.8.8: ICMP echo request, id 32992, seq 52, length 64
Wait a minute, my packets are going through wlan0. It means they’re successfully leaving my host right? They why my ping is not working and is not getting any icmp reply packets?
The problem is private IPs. As said before, we’re trying to reach Google’s DNS with 10.0.0.2. This source IP will never reach 8.8.8.8 because routers don’t know what to do with it, they either drop it or send it to some other poor network which does not know about this packet.
How to resolve this issue? We’ll use the magic of iptables!
We’ll use MASQUERADE which in simple terms works as a NAT device, changing the IP address of 10.0.0.2 with it’s own IP address. So for example, if we MASQUERADE our wlan0 interface, when packets from 10.0.0.2 want to reach 8.8.8.8 and they traverse through wlan0, it will change 10.0.0.2 with it’s own IP address which in my case is 192.168.1.108. This way, your home router will know what to do next and how to send and receive icmp echo and replay packets.
Let’s reach Google:
iptables -tnat -I POSTROUTING -o wlan0 -j MASQUERADE
Now, do another tcpdump capture:
root@dont:~# tcpdump -ni any dst 8.8.8.8
16:55:45.502663 vethc1 P   IP 10.0.0.2 > 8.8.8.8: ICMP echo request, id 49508, seq 4, length 64
16:55:45.502663 br0   In  IP 10.0.0.2 > 8.8.8.8: ICMP echo request, id 49508, seq 4, length 64
16:55:45.502713 wlan0 Out IP 192.168.1.108 > 8.8.8.8: ICMP echo request, id 49508, seq 4, length 64
As you can see, packets leaving wlan0 are getting the IP address of 192.168.1.108.
Note: if your ping command is still stuck and not getting any icmp responses, do a CTRL+C and ping again.